Recently a few VR jobs came across my desk. I had done some equirectangular grading in the past, but it was always for VFX plates, Dome Theaters, or virtual production sets. These recent projects were different because they were purposely shot for 180 VR. Sorry, no looking back over your shoulder. The beauty of this format is that it brings back some of the narrative language that we have cultivated over 100+ years of cinema. We can direct your eye through shadow and light or pull your attention with a sound effect and sudden action. All while not having to worry if you are looking in the right direction.
I thought it would be a good idea to share what I have learned working with this type of immersive content. It’s all out there on the web but hopefully, this pulls it all together in one place and saves all of you a bunch of googling.
It all starts with a stitch
First, you will need to choose a rig. There are many off-the-shelf kits you can buy or you can go the homebrew route and cobble together a few cameras. There are also some interesting standalone devices that save you from having to use/manage multiple cameras. In all cases, there will be some post-processing needed. You will need stitching software like Mistika VR or Cara VR for multiple camera rigs.
Stitching is the process of combining multiple cameras together, color balancing them, and then feathering the overlapping pixels to create one seamless equirectangular image. There are a lot of tutorials on stitching and this post is not that.
6 cameras stitched
The red lines are the edges. The green lines are where the feather starts for the overlap.
Equidistant Fisheye
Extremely wide fisheye setups will need to be converted from equidistant fisheye to equirectangular
Want to avoid stitching all together? Use a very wide-angle lens. There are extremely wide fisheye setups that can capture more than 180 degree field of view. These will need to be converted from equidistant fisheye to equirectangular, but other than that, no stitching or post-processing is needed. Canon has just recently released a fantastic dual fisheye product that further simplifies capture. No matter the setup the end result of the post process will be a 2:1 canvas with each eye being a 1:1 equirectangular image placed side by side. This is probably a good time to talk about what an equirectangular image is.
Equirectangular Projection
This type of spherical visualization is basically the map of the globe that you had in school. It’s what happens when you take a sphere, map that to a cylinder, and unroll the cylinder to a flat projection. That is a gross oversimplification, but a good way to visualize what is going on nonetheless. Please see the equations below if you are coding something or if you are just a maths fan.
Spherical to Planar Transform
This is the concept of 360 video. We work with it in a flat plane during post. Same idea for 180 VR video, but just one hemisphere instead. Click to see higher quality.
Ok Cool, I have VR Videos… Now what?
At this point, your videos are ready for post. I would consider everything up to this point dailies. Now it’s time to edit. All the usual editors we use daily can cut together these video files, but some are better suited than others. Premiere would be my first choice, with Mistika Boutique being a close second. In my workflow, I use both since the two tools have different strengths and weaknesses. Premiere has a clever feature that uses Steam VR and feeds your timeline to a headset. This is indispensable, in my opinion, for that instant feedback one needs while cutting and grading. VR is a different beast. Straight cuts, unless carefully planned out, can be very jarring if not nausea-inducing. Fades work well but are sort of the VR equivalent of “if you can’t solve it dissolve it.” Having all of these transitions live for evaluation and audition in the headset is what separates Premiere from the rest of the pack. SGO has recently released the ability for HMD review similar to Premiere, but I have yet to use the new feature. I will update this post once I take it out for a spin.
9/7/2023 Mistika update
So, I finally took Mistika’s HMD monitoring for a spin. It was super easy to set up. First, you download DEO VR player to your headset. Next, you click the HMD icon in Mistika. This will give an HTTP address with the ip of your machine. Type that into the address bar in DEO VR and ta-da. You end up with super steppy streaming VR video of your current environment.
It was OK to check geometry and color, but It would be hard to use for review. There are a couple of advantages to working this way, though. Multiple headsets are able to connect to the same stream. This is great when you have a room full of folks and everybody in their own headset. With Premiere, we pass the HMD around while everyone else views on the projector or stares at whoever is in the headset, patiently waiting for their turn. Another benefit is remote monitoring. You can technically serve out the ip of your local machine (this will probably need some port forwarding on your router and some VPN shenanigans) to the world. This means someone remote can connect, provided they are on the same network.
Pros
Easy setup
Multiple viewers at once
Remote viewing
Instant HMD feedback
Cons
Steppy playback
Needs a network-attached machine
Low resolution to maintain interactivity
Setting up your project
Premiere has a couple of dependencies to enable VR viewing. First, you need to install Steam VR. This is all you need if you are using a Windows Mixed Reality headset. You will need to install the Oculus software if you plan on using the Facebook offerings via Occulus link.
Now that your HMD is set up. Check out this blog post for step-by-step settings to get Premiere ready to edit VR. The settings are the same for 180VR. Just change the Horizontal Capture settings from 360 to 180.
Change “360” to 180 for VR180 editing.
Who’s Daniel and why do I care?
One downside about Premiere is the dreadfully slow rendering of HEVC files. Not to mention the 60mbps limitation. The Adobe dev team knows my feelings on the matter so hopefully, this will be fixed in a future update, but until then here is a crafty workaround. Cinegy is a company that makes a codec called daniel2. They have their own renderer. We don’t really care about their codec but we do like that their Cinegy HEVC render is way faster than Premiere’s native one. Here’s how to install it.
download and install
go to email and copy the license (it’s free but still needs to be licensed)
open the Cinegy license manager and paste the number
open a Premiere timeline and, press ctrl m for export, and check to see if Cinegy comes up as an export option.
set your bitrate and hit go. I would recommend a bitrate around 130mbps. This allows enough headroom for audio and will not have any issue playing back on the Oculus Quest 2.
The compromise of all this speed is what’s missing from the header of the video file. The file will be missing the flag that lets players know that it is a VR180 file. You can also use Resolve or Mistika for fast HEVC renders as an alternative to Daniel2. No matter how you get your HEVC file you will need to ensure the header is correct. More on this after we sync the audio.
Audio is not my world
I’m a picture guy. Some would even say a big picture guy ;) The one thing I know for sure is that when it comes to audio, I know when it sounds good, but I haven’t a clue on what it takes to get it there. But no more excuses! This is the year that I want to dig deeper. Check back in a few and I hope to update this section with the FB 360 Protools integration information. Until then, the audio is best left to the pros.
Spatial sound can come in different orders with better immersion the higher you go. First-order ambisonics has 4 channels. Second-order has 9, while Third-order files contain 16 tracks. Now it may seem that third order is the way to go, but in my experience, the difference between second-order and third-order isn’t that noticeable on the built-in headset speakers. Then again, I’m, a picture guy. Whatever sound you receive from your mix, you will need to sync it to your HEVC file.
We use the FaceBook 360 app to marry the picture to the spatial sound. The app has some dependencies to install before you can use it.
Python - if you are like me you may have already had this one!
FFMPEG - this link has a tutorial for installing on a Windows machine. Click “code” then “Download Zip.” Uncompress and copy to the FB360 directory
GPAC - make sure you use the legacy 0.8.1 version. This stumped me for a bit the first time.
Now we can run FB360 The first step is to point to your video file. Then choose the right order of ambisonic audio and point to the wav file from the mix. There is also an option to load a standard “head locked” stereo audio track. This can be good for narration, music, or other types of audio that do not need to be assigned a spatial location.
Finally, we hit “Encode.”
It’s not a vaccine but it is an injection
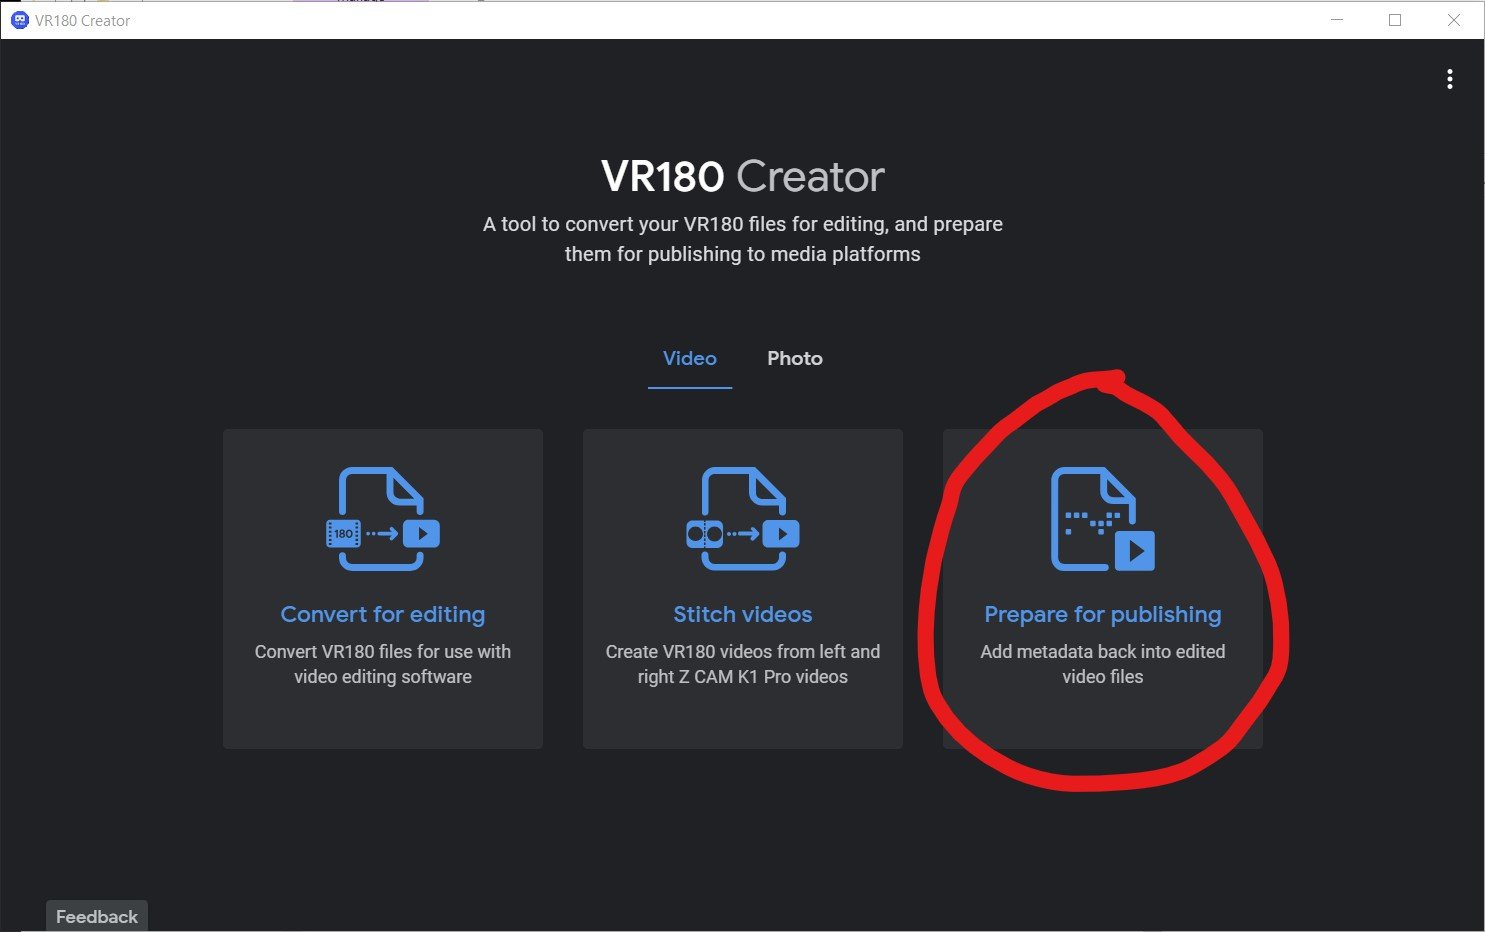
Google VR 180 Creator can be downloaded here. You can’t even find this anymore but it’s super important. There are other options including the original source code for this app, but this little gizmo is by far the easiest way to inject the proper metadata into the header of your HEVC file. This lets players know it’s a side-by-side 180 VR file.
VR180 Creator
Click “Prepare for Publishing. Drag your video in. Set it to side by side and hit export. You will have a new video that has been “injected” with the correct metadata.
How do I view the final product?
Plugin your Oculus Quest into your computer and put it on. Click allow file transfer. Now take off the headset and go to your computer. It will show up as a USB drive. Navigate to the movies directory and simply drag your files across. Now you can unplug your Oculus. Go to Oculus TV/ my media and click your video. If everything was done correctly you are now in a stereo 180 world!
You can also upload to Facebook or Youtube for streaming distribution. Here are two links that contain the specs for both. As with all tech, I’m sure these will change as better headsets are released.
Thank you to the experts that have helped me along the way.
Hopefully, this helps navigate the murky waters of VR just a bit. I’m excited to see what you all create. A big thanks to Hugh Hou for making a ton of really informative videos. A tip of the cap to Tom Peligrini for bringing us all together and leading the charge. I also owe a debt of gratitude to David Raines, for not only introducing Hugh to me but also making sure our VR pictures have all the emotion and immersive sound one could ask for. There’s a pretty great team here at Warner PPCS.
As always, thanks for reading.
JD


